Saturday, December 19, 2009

Holiday Breakfast

Morton Family Strata & Broiled Grapefruit

On Christmas mornings my father always made my great grandmothers recipe for baked eggs. This baked strata is my homage to that family tradition, while still allowing me a quiet holiday morning. I think it is great that it cooks, unattended, leaving one for present opening or coffee chats with family. And really, with a big meal looming later in the day, the last thing I want to be doing on a holiday morning is frying eggs.

I really enjoy stealing ideas from movies, hence the strata recipe below. One of my favorite holiday films is "The Family Stone". In the film, this strata plays a minor, but memorable role.

The recipe comes from the website recipezaar.com. I have tweaked the recipe in that the original, inexplicably, calls for canned tomatoes and sliced white onions. I have replaced these with julienned roma tomatoes and a scant handful of chopped scallions. My husband is requesting that next time I make this, it include some sausage or ham. This also seems like a good idea.

Morton Family Strata
(recipe says serves 8, but I think 6 would be more accurate)

8 slices white bread
8 ounces mozzarella cheese, sliced
3 roma tomatoes (halved, scoop the seeds out, then sliced into strips)
13 ounces sliced mushrooms, drained (or sauteed fresh in 1 tablespoon butter)
3 scallions, chopped
5 eggs
3 cups milk
1 teaspoon salt
1 teaspoon oregano
1 pinch garlic salt
parmesan cheese

1) Using a cookie cutter, cut bread into shapes or circles. Set aside.

2) Place bread scraps in bottom of buttered 13" by 9" baking dish. Layer half of the mozzarella cheese over bread. (If it helps, think of building the strata like building the layers of a lasagna. Then, at the end, an egg custard is poured over all the layers, to soak overnight.)

3) Arrange half of the tomatoes and all of the onions and mushrooms over the mozzarella cheese. Cover with the rest of the mozzarella cheese.

4) Arrange the bread shapes on the cheese. Arrange the tomato strips on the bread shapes.

5) Combine slightly beaten eggs, milk, salt, oregano and garlic salt. Pour over the bread.

6) Sprinkle with Parmesan cheese. Cover. Refrigerate for 6 hours or overnight.

7) Bake 1-1/2 hours in a 325 degree F oven, or until knife comes out clean. Let stand for 5 minutes or until firm.Growing up, my mother would sometimes make us broiled grapefruit for breakfast. I think it is a nice accompaniment to the strata. It is quite possibly the most gorgeous breakfast and is at once cozy and elegant. I love that in the midst of winter, with leafless trees and gray skies, there is the cheery pinkness of this grapefruit. What follows is less of a recipe and more of an idea, but one that I hope you'll indulge and try yourself.

Broiled grapefruit

3 pink grapefruits (or enough for each person to get their own half)
light brown sugar

1) Turn on the oven broiler.

2) Cut the pink grapefruits in half. Take a moment to run a small knife around the segments. The idea is to precut the segments so that after they have been heavenly crusted with brown sugar, they can be easily scooped out with a spoon. This small time investment is completely worth it.

3) Top each grapefruit half with about 2 tablespoons of brown sugar. If it does not look like enough, by all means, add more.
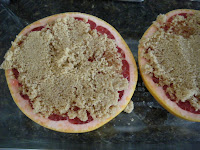
4) Place the grapefruit halves on a rimmed baking sheet and broil until the sugar is melted and somewhat caramelized.

5) Please take a moment to admire it's color (and let it cool ever so slightly) then enjoy.

Sunday, December 6, 2009

butternut squash soup

My husbands family adores butternut squash. I do not know if I can honestly say I had ever even had butternut squash before I spent my first Thanksgiving with them. But there it was, this gorgeous, golden orange mash, right alongside the potatoes on the Thanksgiving buffet. I am so grateful that this flavor is now part of my Thanksgiving canon. It is sweet and earthy and so ridiculously good for you.
I have also discovered that I love butternut squash soup. And really, after a few days of Thanksgiving leftover indulgence (pumpkin pie for breakfast, turkey melt sandwiches for lunch) I find a light soup like this butternut squash quite welcome. It is comforting but not cloying. The recipe is from Giada De Laurentiis. Her recipe calls for a fontina crostini. I like it as is with a bit of cheese (sharp English cheddar) and crackers (pepper poppyseed water crackers are the current addiction) on the side.

Butternut Squash Soup

2 tablespoons butter, at room temperature
2 tablespoons extra-virgin olive oil
1 medium onion, chopped
1 medium carrot, peeled and chopped into 1/2-inch pieces
3 cloves garlic, minced
3 1/2 pounds butternut squash, peeled, seeded, and cut into 3/4-inch pieces (about 7 to 8 cups) (peeling a butternut squash is the least fun job ever- please be careful)
6 cups low-sodium chicken stock
1/4 cup chopped fresh sage leaves
salt and freshly ground black pepper

1) In an 8-quart stockpot, add the butter and oil and melt together over medium-high heat. Add the onion and carrot and cook, stirring occasionally, until the onion is soft, about 5 minutes.

2) Stir in the garlic and cook until aromatic, about 30 seconds.

3) Add the squash and the chicken stock. Bring the mixture to a boil and add the sage. Continue to boil until the vegetables are tender, about 20 minutes.

4) Turn off the heat. Using an immersion blender, blend the mixture until smooth and thick. Season with salt and pepper, to taste. Keep the soup warm over low heat. (A small note: While this recipe utilizes an immersion blender, I think a food mill or regular blender would work just fine. I do have to say that I treasure my immersion blender and give it all my gold stars for ease of use.)

Tuesday, November 24, 2009

pumpkin cupcakes with nutmeg cream cheese frosting

I have more than a slight obsession with nutmeg. Good friends of mine will tell you that I like to drink my eggnog with the nutmeg shaker close by- and regularly give it a good dose. I also think that besides the eggnog application, nutmeg is rather undervalued. It is often added to recipes alongside loud cinnamon and pushy ginger; it's quiet voice lost.

No more- in this treat it is nutmeg's turn in the spotlight. I think it pulls off quite a performance.

The pumpkin cupcake recipe is from Martha Stewart. com. The Cream Cheese frosting is in Ina Garten's The Barefoot Contessa Cookbook - the nutmeg is my addition.


Pumpkin Cupcakes


2 cups all-purpose flour

1 teaspoon baking soda

1 teaspoon baking powder

1 teaspoon coarse salt

1 teaspoon ground cinnamon

1 teaspoon ground ginger

1/4 teaspoon freshly grated nutmeg (pre-ground is just fine)

1/4 teaspoon ground allspice

1 cup packed light-brown sugar

1 cup granulated sugar

1 cup (2 sticks) unsalted butter, melted and cooled

4 large eggs, lightly beaten

1 can (15 ounces) pumpkin puree


1) Preheat oven to 350 degrees. Line cupcake pans with paper liners; set aside. In a medium bowl, whisk together flour, baking soda, baking powder, salt, cinnamon, ginger, nutmeg, and allspice; set aside.


2) In a large bowl, whisk together, brown sugar, granulated sugar, butter, and eggs. Add dry ingredients, and whisk until smooth. Whisk in pumpkin puree.


3) Divide batter evenly among liners, filling each about halfway. Bake until tops spring back when touched, and a cake tester inserted in the center comes out clean, 20 to 25 minutes, rotating pans once if needed. Transfer to a wire rack; let cool completely.


4) When cooled completely, frost with nutmeg cream cheese frosting (see recipe below). Add a dash of nutmeg to the top of each.


Nutmeg Cream Cheese Frosting


1 pound cream cheese at room temperature

3/4 pound unsalted butter at room temperature

1 tsp vanilla extract

1 1/2 pounds confectioners sugar, sifted

1/4-1/2 teaspoon nutmeg (to your taste- Of course I go for the 1/2 teaspoon)


1) Blend together the cream cheese, butter, vanilla and nutmeg.


2) Add the confectioners sugar and mix until smooth.


pumpkin chocolate chip cookies

This recipe is from my Grandma Irene. She is a fantastic cook, collector of recipes and the classiest woman I know. As a kid, I saw a picture of Jackie O and thought it was my Grandmother. She is that classy.
I love how a particular recipe can make me feel connected to people. For example, this recipe came to me via my sister but it is originally my grandmother's. My family and I are spread out around the country, but anytime I make these cookies, I feel what it is like when we are together. Today, when I was talking to my mom, I told her I was making these cookies. I could hear that collective nostalgic sigh- for comfort and love and how that is all wrapped up in this spice laced cookie.
These cookies are fun because they are just a little bit different than the standard pumpkin treat. They also keep beautifully. The chocolate chips are my addition. I love the combination of chocolate and pumpkin, but if you don't, feel free to leave the chips out.

Chocolate Chip Pumpkin Cookies

1 1/2 cups butter, room temperature
2 cups light brown sugar
1 cup granulated sugar
1 15 oz. can pumpkin
1 egg
1 tsp vanilla
4 cups flour
2 cups quick oats
2 tsp baking soda
2 tsp cinnamon
1 tsp salt

1) Preheat the oven to 350.

2) Cream together the butter and sugars until fluffy.

3) Mix in pumpkin, egg and vanilla.

4) In a separate bowl, wisk the dry ingredients together. (I usually sift my flour before adding because I am paranoid about lumps, but please don't feel it's a requirement.)

5) Add the dry ingredients to the wet ingredients until blended. (Yes, it is a huge batch of cookie dough. Good luck stirring. At this point, even my stand up mixer is complaining.)

6) Stir in the chocolate chips by hand.

7) Drop by tablespoons on to an ungreased cookie sheet and bake for 10-15 minutes until golden. Let the cookie sit for a couple of minutes on the cookie sheet before transferring them to cool on cookie racks.

I do not technically know how many cookies this recipe is supposed to yield. But I almost always get about 4 dozen.

Sunday, September 27, 2009

deviled egg salad with rocket sandwich

I first had egg salad with rocket on the balcony of the Tate Modern overlooking the River Thames on a drizzly London day. I like the peppery bite the rocket (arugula) adds to balance the creaminess of the egg salad. From that sandwich (kind of sad that my inspiration from the Tate Modern was stuck at egg salad) I realized that I love deviled eggs ever so much more than I like bland egg salad. The result is that I now make my egg salad more like deviled eggs- lots of fresh cracked pepper, cayenne pepper, dijon mustard, and a splash of white wine vinegar. This, on whole wheat bread with a layer of rocket, makes for an egg salad that has a nice kick.
It seems silly, even to me, to be including an egg salad sandwich recipe. As if any of us needed help knowing what to put between two slices of bread. I console myself by saying I am including this as just a simple idea that I love to eat. It is this idea that makes a little better experience of my work day lunch. I share it with you in the hopes that you will be similarly inspired to take an extra 2 minutes when packing your work day lunch (since packing a lovely lunch is the pinnacle of recessionista chic.) Not that egg salad sandwiches should be limited to lunch time fare. I have been known to bring a tupperware of deviled egg salad along (in a cooler of course) on car camping trips. It is pretty great for an easy camping breakfast. I should also disclose that the sandwich photographed above was happily consumed for my Saturday night supper.

Deviled Egg Salad with Rocket Sandwich

3 Hard Boiled Eggs*
3 tablespoons mayonnaise
1 tablespoon dijon mustard
dash of white wine vinegar
cayenne pepper
salt
pepper
2 slices whole wheat bread
small handful of rocket leaves (rocket is a more fun, and I am pretty sure British, way of saying arugula. Regardless, it is sold in a bag at my grocery store as arugula and I think it is a nice sandwich green)


1) Hard boil the eggs: put three eggs in a small pan with just enough water to cover. Put on the stove at medium high heat. Once the water begins to boil (a really good rapid boil), turn the stove off, clamp on a lid and leave the eggs alone for 20 minutes. After 20 minutes, rinse the eggs under cold water and peel off the shells.

2) Cut up the eggs into a medium dice (or whatever suits you) and place in a small bowl. (Probably everyone else knows this, but I only recently discovered that if I scoop the egg yolks out first, the whites are much easier to chop.) To the eggs add the mayonnaise, mustard, dash of white wine vinegar (seriously, just a few drops), and salt & peppers to taste.

3) Spread the egg salad mixture on to one piece of the bread. Top with a small pile of rocket. Top this with another piece of bread. (Note: if planning on bringing for lunch, might I recommend keeping the egg salad in tupperware and assembling the sandwich right before it is eaten? Otherwise things can get pretty soggy.)


*I realize that three eggs are a lot for one person to eat. I can only say that whenever I make egg salad with two eggs, my sandwich feels a bit skimpy. It is entirely possible that I am being too greedy.

Monday, September 14, 2009

north douglas chocolate cake

I first made this cake for my sister's birthday. I think I was like 16. I was pretty busy flirting with my boyfriend (now my husband) and forgot to butter and flour the cake pans. I remember trying to explain this to my mother, minus the flirting detail. To this day, whenever I butter and flour a cake pan, I remember the buzz of young love.
This cake has it's own kind of sugary chocolatey buzz going on. For me, it is the quintessential chocolate layer cake. I'll admit, there's no wow factor in the presentation, but I think that's part of it's charm- it's simplicity. The cake is tender (thank you buttermilk) and as the day wears on it does a nice job soaking up the chocolate frosting.
The recipe is courtesy of The Fiddlehead Cookbook. The Fiddlehead was a restaurant and bakery in Juneau, Alaska. I like to think of it as the Alaskan version of Chez Panisse- celebration of local ingredients and beautiful understated cooking. My understanding is that the cake is named for it's creator, who lived on nearby Douglas island.
When I was getting married, my husband and I registered for their cookbook and I was thrilled when we received it along with this thoughtful inscription from it's givers "To love deeply in one direction makes us more loving in all others- Anne Swetchine".
This cake is certainly something to love and share with those you love. Just be sure to butter and flour the pans.

North Douglas Chocolate Cake

Cake:
1 cup water
1/4 pound butter
1/2 cup safflower or corn oil (I rarely have either and usually substitute vegetable oil)
3 1/2 tablespoons sifted Dutch process dark cocoa (Original recipe note: "other cocoas produce a lighter, sweeter cake and icing, more like milk chocolate". I use Hershey's cocoa powder and it's true that it does make a more milk chocolatey cake.)
2 cups unbleached white flour
2 cups granulated sugar
1 teaspoon baking soda
1/2 teaspoon salt
2 eggs
1/2 buttermilk
1 teaspoon vanilla extract

Icing
1/4 pound plus 4 tablespoons butter
4 cups sifted confectioners' sugar
1/2 cup sifted Dutch process dark cocoa
3 tablespoons milk (not buttermilk this time, just regular milk)
1 1/2 teaspoons vanilla extract

Cake
1) Preheat oven to 375 and arrange racks so they are evenly spaced in oven. Generously coat two 8 or 9 inch cake pans with butter and dust with flour.

2) Combine water, butter, oil, and cocoa in a small pan and bring to a boil.

3) While butter and water are coming to a boil, sift together flour, sugar, baking soda, and salt in a large mixing bowl. Set aside.

4) Wisk together eggs, buttermilk, and vanilla in a small bowl and set aside.

5) When butter and water are boiling, pour over sifted flour (this is very fun). Stir until just combined. (If you have a stand mixer, you might want to let it sit this recipe out- I mix all of this by hand to ensure I don't overbeat it). Add egg mixture and gently fold together. Pour into prepared cake pans.

6) Bake for 20 to 25 minutes (8-inch pans will take a little longer than 9-inch pans). Remove from oven when a probe inserted in center of cake comes out clean. Allow to rest briefly in pans, then turn out onto racks to cool completely.

Icing
7) In a medium bowl (this is where I find a mixer most helpful) beat butter until smooth. Add confectioners' sugar and cocoa and stir gently until they are partially combined (If you crank your mixer up too high right away, you will end up wearing most of the sugar and cocoa). Stir in milk and vanilla. Beat until smooth and spreadable. (It may be necessary to add additional sifted confectioners' sugar if mixture seems too soft).

Assembling the Cake
8) Place first layer, top side down, on bottom of an inverted cake pan. Spread with 3/4 cup icing. Place second layer on top of first, top side down. Spread with 1 cup icing, allowing a little to go over the sides. Using a straight-sided metal spatula (I can assure you a butter knife is just fine) ice the sides of cake, filling crack between layers with icing. Smooth out top of cake and use remaining icing to decorate cake as you like. Chill cake briefly to firm icing.

9) Using a large spatula, transfer cake to a cake plate (unless you are very brave and very clever- I am neither- do yourself a favor and frost the cake on the plate you plan to serve it on. Just tuck pieces of parchment paper under the edges to catch smudges and then whip them out before serving). Serve at once, or cover and store at room temperature.

Tuesday, August 4, 2009

chocolate croissants


Chocolate Croissants

I will confess to being quite pleased with myself whenever I made these. The way their sweet little shapes puff up all golden and promising in the oven inspires a little "ta-da!" when they are brought out. They require very little effort but provide a nice buttery chocolately pay out. 

The picture above was taken during a visit back home. To impress my family (which is what we all really try to do on home visits), I made the croissants for a late breakfast. They were well received. I do not believe they lasted longer than 7 minutes after this picture was taken. 

The recipe is from the cookbook "Nigella Express". The author, Nigella Lawson, is a favorite. She resides in London, so please read the recipe with your best British accent.

I include my own comments in parenthesis. I like to think they are helpful, but if they're not, please feel free to ignore.

Chocolate Croissants

Half a 17.2 oz. package ready rolled butter puff pastry (I use frozen puff pastry)
2 1/2 oz. chocolate- milk or dark depending on taste (I use chocolate chips)
1 egg, beaten

1) Preheat the oven to 425. Unfurl the sheet of pastry and then cut it into 4 squares. (I find it helps to buy the puff pastry that is frozen flat in sheets, not rolled or folded up. Nothing ruins a tranquil domestic goddess moment like cursing at puff pastry.)

2) Cut each square diagonally to give 2 triangles- they will appear quire small. Put the triangle with the wider part facing you and the point away from you.

3) Break off small pieces of chocolate- approx. 1/2 inch (this is where I substitute choc. chips) to place about 3/4 inch up from the wide end nearest you.

4) Then carefully roll from that chocolate-loaded end toward the  point of the triangle.

5) You should how have something resembling a straight croissant. Seal it lightly with your fingertips and curl it around into a crescent.


6) Place the chocolate croissants on a baking sheet lined with baking parchment, aluminum foil, or Silpat and paint with the beaten egg (if you do not have pastry brushes or if your pastry brushes have mistakenly been repurposed as bbq sauce brushes, a paper towel dipped in the egg will do just fine). Bake for 15 minutes until golden and puffy and exuberantly, if miniaturely, croissant-like. (Please feel free to say "ta-da!")


Sunday, May 31, 2009

apple cardamom cake with caramel frosting

This cake is truly lovely. In the past it has made work appearances for a couple of colleagues birthdays. More recently, it has become my husbands favorite cake. He wants the whole thing for himself. I can't really blame him- it is dense, super moist and spicy with a gorgeous caramel frosting (that's really more of a glaze). A wedge for breakfast with a cup of coffee makes facing the day that much easier. I firmly believe in cake for breakfast.

The cake recipe is from Everyday Foods magazine. They call it "applesauce cake". But I prefer "apple cardamom cake" because the addition of this spice really makes it special. It is perfect all on its own or with a dusting of powdered sugar. But if you really want to gild the lily, the caramel frosting is in order. The caramel frosting recipe is from The Joy of Cooking.

It is probably bad form to include a recipe that requires a candy thermometer, but I can assure you that creating this frosting is quite satisfying in a mad scientist sort of way. Please just be warned that the caramel gets quite hot while it's cooking and no matter how tempting it might be to dip a spoon in and taste it, it is important to resist.

Apple Cardamom Cake

3 cups all-purpose flour (spooned & leveled)
2 teaspoons baking soda
1 teaspoon salt
1 1/2 teaspoons ground cinnamon
1 1/4 teaspoons ground cardamom
1 cup (2 sticks) unsalted butter, room temperature
2 cups packed light-brown sugar
1/4 cup honey
2 large eggs
2 cups Basic Applesauce (if you make your own, bless you, and feel free to use it here. I don't and so I prefer to use Trader Joes Chunky Applesauce. But any store-bought chunky applesauce is fine.)
nonstick cooking spray

1) Preheat oven to 350. In a large bowl, whisk together flour, baking soda, salt, cinnamon, and cardamom. Set aside.

2) In another bowl, with an electric mixer, beat butter, brown sugar, and honey until light and fluffy. Add eggs, one at a time, beating until combined. With mixer on low speed, gradually add flour mixture; beat just until combines. Beat in applesauce.

3) Generously coat a nonstick 9-inch tube pan (I use bundt pan) with cooking spray. Spoon batter into pan; smooth top. Bake until a toothpick inserted in the middle comes out clean (but slightly wet), 50 to 60 minutes.

4) Cool on a wire rack in the pan for 10 minutes. Turn out of pan onto a cutting board or baking sheet; invert cake onto rack, top side up. Please step back and admire it's prettiness and the incredible spicy fog now filling your hoome. Cool completely. If you have time and a sense of adventure, proceed to the Caramel frosting.

Old Fashioned Caramel Frosting

2 cups pack light or dark brown sugar
1 cup heavy cream (can't skimp here, not even half n half will work. Full fat only)
3 tablespoons unsalted butter
1 teaspoon vanilla
1 to 2 tablespoons rum (optional- I've never included this, if someone does, please let me know how it turns out)

1) Combine brown sugar and heavy cream in a medium, heavy saucepan and cook, stirring, over medium heat just until the mixture begins to simmer.

2) Stop stirring, cover, and simmer for 2 minutes to dissolve the sugar. Uncover and wash any sugar crystals from the sides of the pan with a wet pastry brush. Cook, uncovered, until the syrup reaches 238 (this is also called soft-ball stage) on a candy thermometer. Remove from the heat and add, without stirring, the 3 tablespoons butter.
3) Set aside, again no stirring, until the butter is melted and the mixture cools to 110, this takes about 45 to 60 minutes. Then add the vanilla, and if using, the rum. Beat until the frosting cools and is thickened to a spreadable consistency. If the frosting becomes too think, thin slightly with additional heavy cream.

4) Pour/spread the frosting over the cooled apple cardamom cake. Give the frosting at least a minute to set before attacking...