Friday, April 9, 2010

scones

When we were children, my sisters and I loved to play tea party. (That is not a completely true statement since we still love to play tea party. ) We had lovely little tea sets hand painted with forget-me-not flowers and with our friends we would dress up and pretend to be proper (or our version of what we thought proper was.)
Scones never made an appearance at those early parties (I actually cannot recall what our menus consisted of) but for me a fresh baked scone with tea is pretty close to perfection. When my sisters and I go out to tea now, one of the things I look forward to are the scones. Yes, there are some sugary sweet delights to be had at all kinds of coffee houses, but they are nothing in comparison to the buttery, light, flaky heaven that these are. These scones are in the "British style" because they do not have a glaze. I promise, you won't miss it.
The recipe below is from the magazine Everyday Food. I believe it originally appeared around Thanksgiving which is why the recipe calls for fresh cranberries. They are quite good in a scone, but please feel free to substitute other dried or fresh berries depending on your mood and the season. My recent favorite is dried wild blueberries with a little lemon zest. The scones pictured were made with dried cherries.
As with so many recipes I love, these scones can be completely made the night before up to the baking stage. This makes it easy for oven warm scones for tea time (or breakfast or a nice morning treat for deserving co-workers).

Cranberry Scones

2 cups all purpose flour, plus more for work surface
5 tablespoons sugar, plus 1 tablespoon for topping
1 tablespoon baking powder
1/2 teaspoon salt
6 tablespoons chilled unsalted butter, cut into small pieces
2/3 cup half-and-half, plus 1 tablespoon for topping
1/2 cup halved cranberries, drained on paper towels

1) Preheat the oven to 425 degrees. In a bowl, whisk together flour, 5 tablespoons sugar, baking powder, and salt.

2) Cut in butter with a pastry blender or two knives until mixture resembles coarse crumbs.

3) Stir in 2/3 cup half-and-half until just moistened. Gently fold in cranberries.

4) On a lightly floured surface , knead dough gently, 5 to 10 times. Pat into a 1 inch thick round. Cut into 8 wedges. Place on a baking sheet, 2 inches apart. (If making in advance, this is where I pause: place the scones on a baking sheet, wrap with plastic wrap and place in the fridge until ready for baking.)
5) Brush tops with remaining tablespoon half-and-half; sprinkle with remaining tablespoon sugar. Bake until golden brown, 12 to 15 minutes. Let cool on a wire rack. (I like to use sugar in the raw instead of regular granulated sugar to give the top a nice shimmery crunch. Also, if the scones have been in the fridge for a few hours or overnight, I usually add a couple of minutes to the bake time).

Tuesday, April 6, 2010

scalloped potatoes

These potatoes are the comfort food for my husband. For those of us who have only ever had the box dehydrated scalloped potatoes, they are a kind of revelation. Layers of thinly sliced potatoes surrounded in a faintly onion scented sauce-so lovely and really pretty simple. It is this recipe that taught me how to make simple white sauce and I have found it useful as a base in all kinds of casseroles, pasta and au gratin dishes.
It is great alongside holiday ham but also a helpful way to stretch leftovers. Just layer in diced ham along with the potatoes. The recipe is from Betty Crocker's Best Loved Recipe Cookbook.

Scalloped Potatoes

6 medium boiling or baking potatoes (2 lbs)
3 tablespoons butter (I actually think 4 tablespoons is perfect)
1 small onion, finely chopped (1/4 cup)
3 tablespoons all-purpose flour
1 teaspoon salt
1/4 teaspoon pepper
2 1/2 cups milk
1 tablespoon

1) Heat oven to 350 degrees. Grease bottom and side of 2 quart casserole with shortening.

2) Scrub potatoes; peel if desired. Cut into enough thin slices to measure about 4 cups.

3) Melt 3 tablespoons butter in 2 quart saucepan over medium heat. Cook onion in butter about 2 minutes, stirring occasionally, until tender.

4) Stir in flour, salt and pepper. Cook, stirring constantly, until smooth and bubbly; remove from heat.

5) Stir in milk. (Stir in slowly to incorporate and make a smooth mixture. If the milk is poured in all at once, the sauce can become lumpy.) Heat to boiling, stirring constantly. Boil and stir 1 minute.

6) Spread potatoes in casserole. Pour sauce over potatoes. Dot with 1 tablespoon butter. (I layer the potatoes and sauce kind of like I'm making lasagna. If I'm adding diced ham, it is another layer in this process).

7) Cover and bake 50 minutes. Uncover and bake 1 hour to 1 hour 10 minutes longer or until potatoes are tender. Let stand 5 to 10 minutes before serving.
Because of demand, I can safely say I have always doubled (or tripled or quadrupled) this recipe. If doubling the recipe, I do recommend keeping it split into two baking dishes. If one baking dish is used for a double recipe, it has to bake for about 25 minutes longer and the bottom gets a tad more cooked than is generally cared for.

Saturday, April 3, 2010

chocolate birds nests

Frankly, these are just adorable. They are easy peasy, chocolaty adorableness. They are obviously an excellent choice for Easter celebrations and can do double duty as both table decoration and dessert. However, I think that they could be equally charming at an appropriately themed baby shower.
The colored chocolate shell egg candies are made by Cadbury and are my all time favorite Easter candy. I love the way the robins egg blue looks with chocolate, but feel free to not be limited by my own color obsessions.
I have to give credit where credit is due and acknowledge that the gift bag presentation below was my husbands idea for how I could use up the extra non-blue candy eggs. I put a layer of the chocolate eggs at the bottom of a cellophane bag and then placed the chocolate bird nest on top. They turned out pretty stinkin' cute.

Chocolate Bird Nests

1 12 oz bag semi sweet chocolate chips
1/3 cup peanut butter
3 1/2 cups chow mein noodles

1) Place the chocolate chips in a large microwave safe bowl. Microwave for 1 minute. Stir. Add the peanut butter and stir again. Microwave for another 1 to 2 minutes until the chocolate and peanut butter are melted and smooth.

2) Add the chow mein noodles to the chocolate/peanut butter mixture. Stir to coat noodles.

3) Cover a cookie sheet with wax paper. Drop large spoonfulls of the chocolate noodle mixture onto the waxed paper. Shape each mound lightly with the spoon (or fingers) into a nest shape.
Place the chocolate eggs into the nests.

4) Let set, uncovered, for several hours (over night is best) until the chocolate hardens. If storing, be sure to place wax paper between layers.


Note: I am aware that these days quite a number of people have peanut allergies. The peanut butter can easily be left out.

Tuesday, February 9, 2010

weeknight chicken noodle soup

During the work week, my husband and I kind of have an unspoken check in around 4:30pm every day. It's that chance for us to say hello and talk about the evening- confirm late meetings, dinner plans, etc. Sometimes that phone call or email is also the first notification that one of us is not feeling well and that what started out as a sore throat in the morning, has now hideously morphed into a sore throat- smashed sinus- throbbing head cold.
Sickness rarely schedules itself at a good time and getting sick in the midst of the midweek whirl of work, activities, and commitments is always lame. When I am sick (or taking care of someone sick), I want to provide comforting soothing things, like soup.  But the time crunch between the end of the work day and the beginning of the dinner hour does not allow a lot of time for homemade soup making. Enter weeknight chicken noodle soup. I make this for those nights (and really anytime) that I crave homemade soup but do not have the time to poach my own chicken or make my own stock. This is not a magic recipe (it still takes some time, I'd say about 45 minutes) but it is made far less laborious by relying on a pre-cooked rotisserie chicken and pre-made stock.
Is stock made from scratch the best? Absolutely, no dispute there. However, it is also time consuming. For years, I had read in so many cookbooks that the only real way to make soup was to make one's own stock and I must admit I was so completely intimidated that I did not make soup for a long time. Then I realized that we have to keep living and more often than not this means I use store bought chicken stock in my cooking. I take enormous comfort in knowing that Nigella Lawson uses bouillon cubes or concentrated stock pretty regularly in her recipes.
I hope this soup will nourish you and those you love on busy nights. 

weeknight chicken noodle soup

1 lg. yellow onion, chopped
3 celery stalks, chopped (I like to cut them on the bias to make them look pretty)
3 carrots, chopped
1 rotisserie chicken
(3) 32 oz. containers of chicken stock
1 16oz. package of egg noodles (I use about 3/4 of the package)
2 teaspoons chicken bouillon powder
salt and pepper to taste
1 bunch Italian parsley

1) Chop the veggies and cook on medium heat in a large pot with a good glug of olive oil (about 1 tablespoon.) Cook until the onions are translucent. (A fun fact: onions, carrots, and celery all cut up together are referred to in French as a mirepoix and are the starting base for many soups and sauces. I've noticed some grocery stores now carry little tubs of pre-cut mirepoix in the produce department.)
2) Pour in the chicken stock and raise the heat to medium high. While the veggies soften up, shred the rotisserie chicken (discard any skin and bones) and add to the pot.

3) Once the stock is simmering, add the noodles and cook until tender (about 11 minutes). This is a good point to taste the broth for flavor. I prefer a good bit of black pepper in my chicken soup (like grandma makes it) and if the broth feels a bit thin, a couple of teaspoons of chicken bouillon can help.

4) Once the noodles are cooked through I like to stir in a large handful of rough-chopped Italian parsley leaves.

5) Serve a large steaming bowl to someone in need of comfort or cheering up.


mascarpone, lemon curd & cookies

I have been noticing mascarpone showing up in recipes lately. It is an Italian cheese that is kind of sweet, but mostly just marvelously creamy. It has a consistency similar to cream cheese, but is so much lovelier.
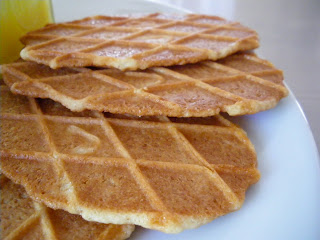
This is one of my favorite little sweet snacks: creamy mascarpone spread on a waffle cookie with a dab of lemony lemon curd.
I like to keep all the components on hand to share with friends. It is effortless, simple and just enough different to be interesting.

Of course Trader Joes makes the best mascarpone, lemon curd and waffle cookies. However, these treats can also be found at other specialty food stores. They are worth the extra trip.

Wednesday, January 27, 2010

citrus ice

I have a small collection of recipes that I consider my "go to" recipes- dishes that I can put together with a small amount of ingredients, fuss, and time. This is one of them. It's elegance belies it's ease. I provide the recipe as a guide and hope that it be used as I use it- for any manner of citrus available. As I am resolutely on my ruby red grapefruit binge, they have been used here. However, the ice is equally love with lemon, lime or a combination therein.

I use the word "ice" because the end form really depends on what tools are utilized. I always hate it when I open a cookbook and see gorgeous photos and intriguing food, only to read on and find that I have none of the specialty equipment to make any of it. I now own an ice cream maker and can say that I consider making ice cream to be a perfect dessert solution (completed far in advance- days even, rather simple, delights everyone). However, if you do not have an ice cream maker, no worries. By freezing the citrus and simple syrup mixture in a metal pan, you can create a granita. If the mixture is freezed in an ice cream maker, the result is sorbet.

This recipe is adapted from Susan Branch's cookbook "Heart of the Home".
Citrus Ice

2 cups water
2 cups sugar
1 to 1 1/2 cups citrus juice: the number of lemons, limes, or grapefruits will depend on their size.
citrus zest (for lemon or lime ice, I suggest about 2 tablespoons of zest)

1) Make the simple syrup- Place the water in a saucepan, stir in the sugar and boil until dissolved. Remove the mixture from the heat and let it cool. Congratulations you have now made simple syrup! (equal parts water and sugar, it is used in all kinds of desserts and cocktails)

2) Once the simple syrup is cooled, stir in the juice (For grapefruit ice, I use 1 1/2 cups of fresh juice, for lemon or lime ice 1 cup). If using, also stir in the zest.

3) For Granita: Pour mixture into a metal pan (I find a loaf pan works well) and freeze. When ready to serve, scrape a fork along the frozen mixture. It creates a light, shaved ice texture.
For Sorbet: Pour into an ice cream maker and freeze according to manufacturers instructions.

A scoop of homemade ice cream or sorbet is pretty much bliss for me. For a good friend of ours, I once made coffee ice cream because I know he loves coffee. I knew it was a wholly successful gesture when a few months later he reciprocated the dinner invitation and served my husband and I a beautiful dish of vanilla and berry ice cream for dessert (from his new ice cream maker, natch).

Saturday, January 23, 2010

french apple tart

It is apparently my secret wish to feed everyone in the world this apple tart. I can only assume this because I made it for nearly every event during the holiday season: Thanksgiving dinner, work potluck, Christmas supper with family, and New Years Day brunch with friends. It really beats any apple pie and is far simpler. Yes, scandalous claim I know, but nonetheless true: only one crust to make and a fanning of sliced apples, a few cubes of butter, and a sprinkling of sugar- really a pretty small amount of effort for how delicious this is.

(Side story: I baked this tart early on Thanksgiving morning and left it to cool on the counter before we would take it over to our friends for Thanksgiving dinner dessert. A bit later I was showering when my husband stuck his head in the bathroom door and hollered "I'm sorry!" and then quickly closed the door again. After getting dressed and returning to the kitchen I found a rather sizeable piece of the apple tart missing and a husband who I do not think was very sorry at all.)

The recipe is from Ina Garten's Back to Basics cookbook. She includes a glaze to put on at the end, but I have to confess, I have never bothered with it. This is partly because I do not really care for apricots but mostly because the tart rarely sits around long enough. Also, Ina brilliantly makes her pastry crust in the food processor. This is sheer genius except my food processor is too small. I include her instructions because if I ever procure a large enough food processor, it will certainly be the way that I will make all my pastry crusts. Until then, I use a little pastry cutter and a mixing bowl. (see note*)

I also feel obligated to add that while this recipe says it serves 6, I have watched 3 people easily polish this off for breakfast.

French Apple Tart

for the pastry
2 cups all-purpose flour
1/2 teaspoon kosher salt
1 tablespoon sugar
12 tablespoons (1 1/2 sticks) cold unsalted butter, diced
1/2 cup ice water

for the apples
4 granny smith apples
1/2 cup sugar
4 tablespoons (1/2 stick) cold unsalted butter, small-diced

for the glaze (which I do not use, but go for it)
1/2 cup apricot jelly or warm sieved apricot jam
2 tablespoons Calvados, rum, or water

1) For the pastry, place the flour, salt, and sugar in the bowl of a food processor fitted with the steel blade. Pulse for a few seconds to combine.

2) Add the butter and pulse 10 to 12 times, until the butter is in small bits the size of peas.

3) With the motor running, pour the ice water down the feed tube and pulse just until the dough starts to come together.

4) Dump onto a floured board and knead quickly into a ball. Wrap in plastic and refrigerate for at least 1 hour. (This step is pretty important, although in a pinch I confess to only allowing the dough to chill for 30 minutes.)

5) Preheat the oven to 400 degress. Line a sheet pan with parchment paper. (Pretty essential- there will be much cursing and general surliness if the paper is left out.)

6) Roll the dough slightly larger than 10 x 14 inches. Using a ruler and a small knife, trim the edges. (In addition to skipping the glaze, I skip this part too. I rather like the rustic look of the tart untrimmed and greedily want all the crust I can get.)

7) Place the dough on the prepared sheet pan and refrigerate while you prepare the apples.

8) Peel the apples and cut them in half through the stem. Remove the stems and cores with a sharp knife and a melon baller (oops, I guess I don't use the melon baller either). Slice the apples crosswise in 1/4 inch thick slices.

9) Place overlapping slices of apples diagonally down the middle of the tart and continue making diagonal rows on both sides of the first row until the pastry is covered with apple slices. Ina Notes: "I tend not to use the apple ends in order to make the arrangement beautiful".


10) Sprinkle with the full 1/2 cup sugar and dot with the butter.

11) Bake for 45 minutes to 1 hour, until the pastry is brown and the edges of the apples start to brown. (I definitely lean more towards 45 minutes baking time). Rotate the pan once during cooking. If the pastry puffs up in one area, cut a little sit with a knife to the let air out. Don't worry! The apple juices will burn in the pan but the tart will be fine!

12) When the tart's done, heat the apricot jelly together with the Calvados an dbrush the apples and the pastry completely with the jelly mixture. Loosen the tart with a metal spatula so it doesn't stick to the paper.

13) Allow to cool and serve warm or at room temperature. (There are people who feel strongly that this should be served warm with french vanilla ice cream. I take it any way I can get it.)

*Note regarding making pastry:
Homemade crust used to terrify me- everyone is always talking about how hard it is- but honestly, I find it just takes a bit of practice. My biggest advice? cold butter, very very cold butter. I leave it in the fridge until the moment it is added.
It is actually enormously satisfying to make my own. And once you get the hang of it and bring this tart to your friends, when they ooh and aah over it's charm and swoon over it's flavor, and turn to you wide-eyed and ask you "Did you make the crust?" You can smile and say, "Why yes, yes I did."
However, if you would like to skip all the heartache or need a short cut, I pass on Ina's advice that a sheet of defrosted puff pastry will also work.